
Purposeful Project Folder Structure
Growing up, I spent countless hours recording Good Eats episodes for my mom to use in her high school cooking classes. Beyond the science and humor, one concept from the show profoundly influenced my approach to work: mise en place, which is the practice of getting everything in place before you begin.
Mise en place
While Alton Brown demonstrated this concept through preparing ingredients and organizing his cooking workstation(s), I’ve found it extends to all areas of life.
Just as a well-organized kitchen enables a smooth cooking experience, an intentional project folder structure forms the foundation of efficient digital creation. Whether I’m producing training materials, blog posts, or YouTube videos, this principle of preparation and organization has become central to my process.
Why
My transition from teaching to corporate training highlighted just how critical this organizational approach is. At school, inheriting teaching materials was straightforward; a friendly exchange of thumb drives followed by hallway conversations for clarification.
The corporate world proved far less forgiving. I often found myself becoming a digital archaeologist, piecing together project files left behind by a ghost with no chance to ask follow-up questions.
This made me realize that another audience exists for my work, not just the person who needs to learn from the training I create. But also someone who will peek behind the curtain to look through my process and use all the intermediate artifacts I created to update my training. That might be future me, or if enough time elapses, it will be someone else entirely.
I needed to make sure I was creating a clear, replicable folder structure as well as documentation and metadata saved in plain text files with the project. I didn’t want to rely on any technology other than what could be saved in the folders using highly resilient and transferable file types. This meant creating a system that would work across platforms and time, while remaining easy to understand and maintain.
How
So, I started thinking about my creative process and the way I work. Fortunately, there is a pretty decent overlap between what I do for my day job (write user guides and create training videos/courses) and what I do for fun here on my blog and YouTube channel. This meant I was able to leverage both perspectives and the similar content types to create unified workflows.
Standardize a Workflow
This process certainly benefits from some systems thinking (a la The Checklist Manifesto). So, I found it really helpful to start with my project templates, which are the consolidated wisdom from every artifact I have ever produced.
The templates were a helpful trigger to thinking about all the intermediate artifacts and meta work that gets produced to make a final product. Then, I looked across the different types of projects I create and eventually came up with a foundational structure that could flex to meet different needs while maintaining consistent principles.
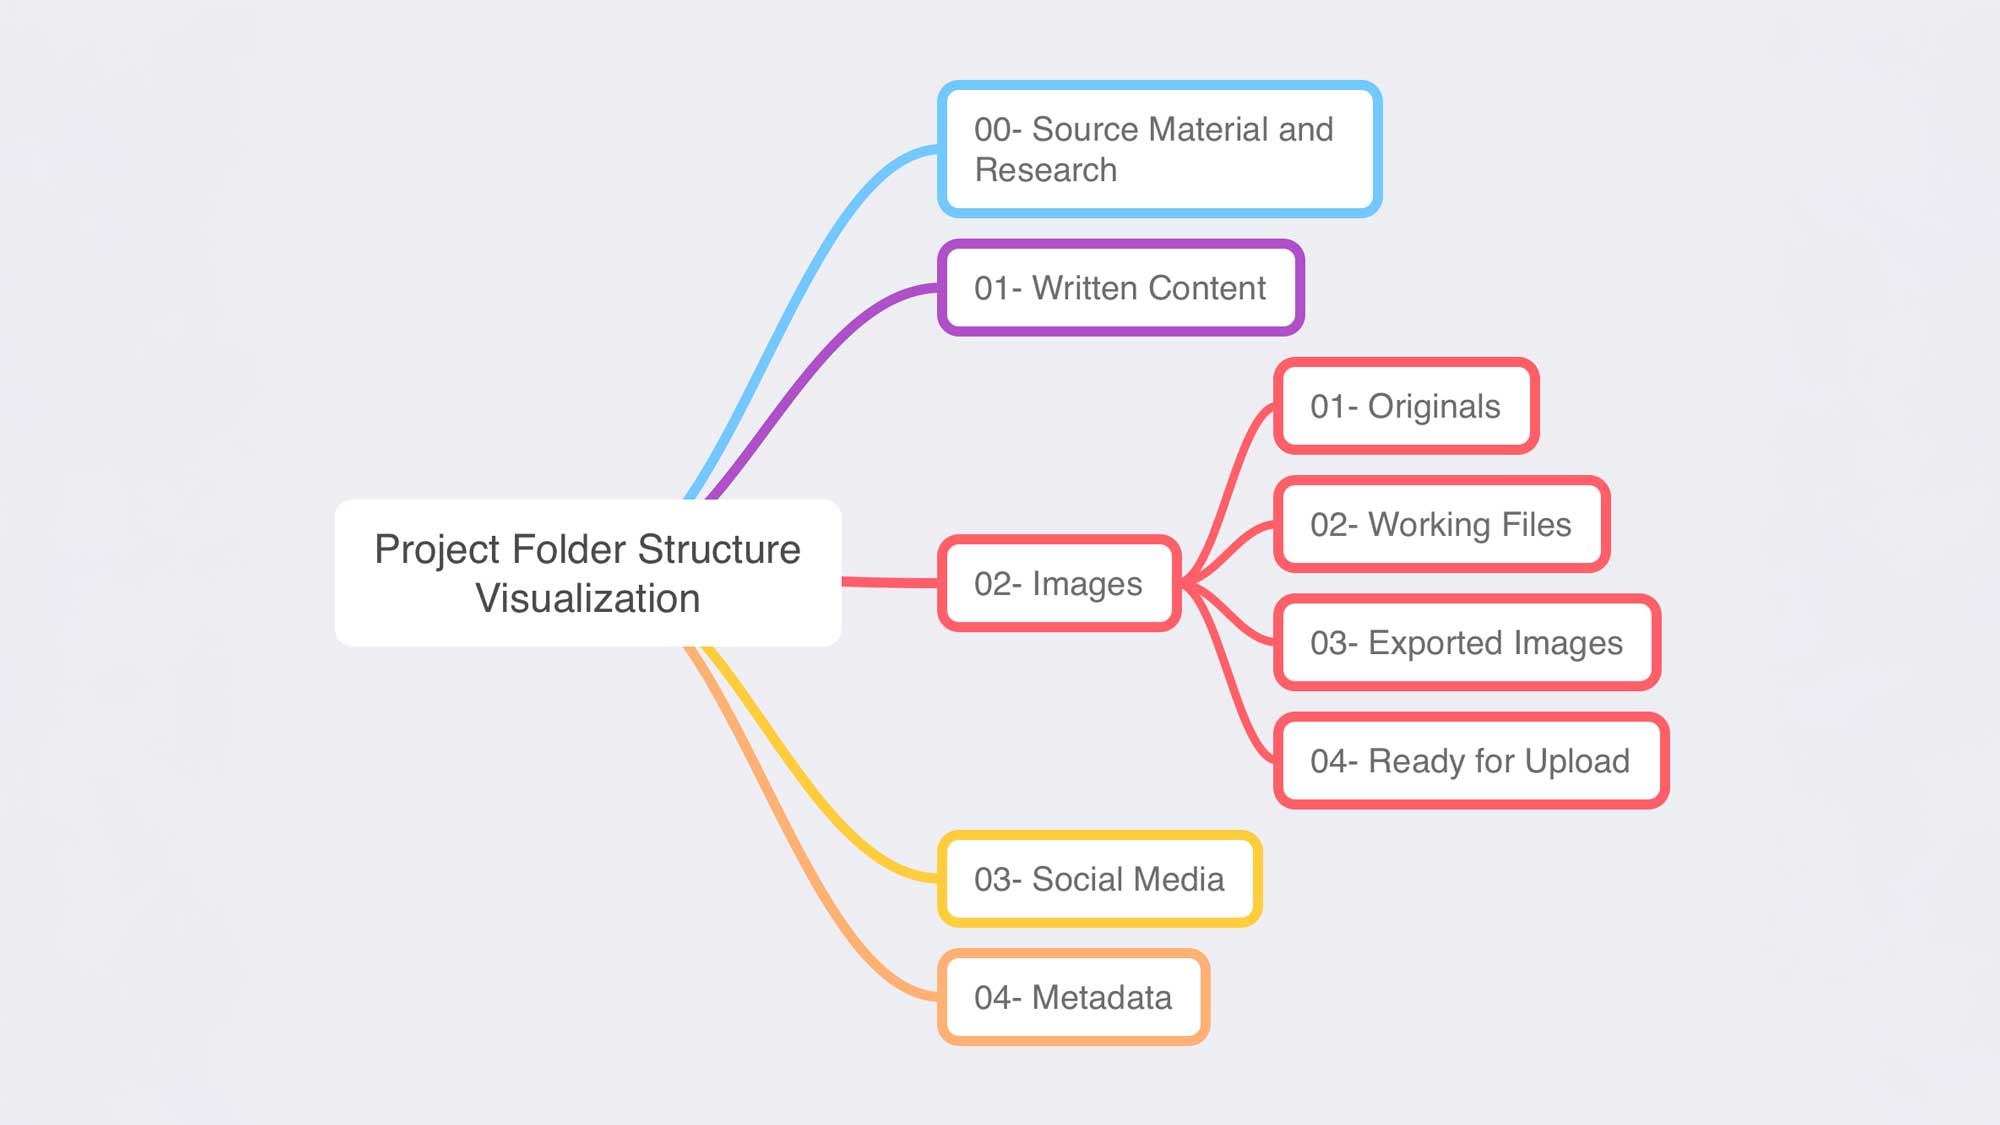
The key insight was that every project, regardless of type, needs:
- A place for source materials and research
- Space for work-in-progress content
- Asset management (images, videos, etc.)
- Project documentation and metadata

For blog posts, this means organizing research notes, draft content, featured images, and WordPress metadata. For training materials, it extends to include video production assets, approval tracking, and detailed project documentation. While the specific folders might differ, the underlying organization remains consistent.
By standardizing this structure, I’ve eliminated the mental overhead of deciding where things should go. Every file has a logical home, and more importantly, future-me (or someone else inheriting my work) can find things without having to decipher my thought process.
Using a Date Prefix for Version Control
I don’t know how many times you’ve received a file with the word “final” in the filename multiple times; it happens to me at least once a week.
I initially tried the software developer approach – version 1.0, 1.1, 2.0, and so on. But I found myself constantly debating whether a change warranted a point update or a major version bump. The overhead of these decisions wasn’t worth the benefit.
The solution came in the form of ISO 8601 date prefixes: a four-digit year, two-digit month, and two-digit day (YYYY-MM-DD). While the hyphens are technically optional, I prefer them for readability. This simple system offers several advantages:
- Files automatically sort chronologically in your filesystem
- The most recent version is immediately apparent
- No mental overhead deciding on version numbers
- No confusion about which file is truly “final”
After nearly a decade of using this system, it’s become second nature. In fact, it’s such a part of my workflow that I created a Keyboard Maestro macro to insert today’s date whenever I type ;CDS (for Current Date Stamp).
This date prefixing is so effective that I don’t even need separate archive folders in my projects. Different iterations of a file can live right where they were created, with their dates telling the story of their evolution.
Automate the Creation of Your Folder Structure
A thoughtful project folder structure is only valuable if it’s consistently used. The more tedious it is to create, the less likely you are to implement it. This makes it a perfect candidate for automation.
While Keyboard Maestro is my go-to automation tool, and it can create folders and subfolders, that process can be cumbersome. The most efficient way to create folders on a Mac is through a shell script. Working with Claude, I developed a script that replaces the tedious folder creation process in Keyboard Maestro with a single “Execute Shell Script” action.
My complete workflow uses a larger Keyboard Maestro macro, but the core interaction is simple: a “Prompt for User Input” action collects the project name, converts it to title case, and passes it to this shell script:
#!/bin/bash
# =============================================================================
# Blog Post Folder Structure Generator
# Version: 1.0
# Created by: Mike Burke (https://www.themikeburke.com) and Claude (Anthropic)
# Last Updated: 2025-02-17
#
# License: MIT
# Copyright (c) 2025 Mike Burke
# Permission is hereby granted to use, copy, modify, and share this script freely,
# provided the above copyright and attribution notices are preserved.
# Full license text: https://opensource.org/licenses/MIT
#
# Description:
# Creates a standardized folder structure and template files for a new blog post.
# This script automates the setup of a consistent working environment for blog post
# creation, including areas for research, content, images, and metadata tracking.
# Designed to work with Keyboard Maestro but can be modified for other automation tools.
#
# Functionality:
# 1. Creates main blog post folder using provided title
# 2. For each new blog post, it:
#    a. Creates main folder with post title
#    b. Generates standard subfolder structure:
#       - Source Material and Research
#       - Written Content
#       - Images (with subfolders for workflow stages)
#       - Social Media
#       - Metadata
#    c. Creates template Markdown files for:
#       - Social media posting tracking
#       - Change log documentation
#       - WordPress metadata
#    d. Organizes image workflow into stages:
#       - Original images
#       - Working files
#       - Exported images
#       - Upload-ready images
#
# Usage:
# 1. Set your preferred base directory in BASE_DIR variable
# 2. Script can be triggered via Keyboard Maestro or run directly
# 3. If using Keyboard Maestro, it provides post title via $KMVAR_TCT variable
# 4. Script creates folder structure in specified directory
#
# Note: If not using Keyboard Maestro, modify the POST_TITLE assignment to suit
# your needs (e.g., accept command line argument or prompt for input)
# =============================================================================

# Retrieve the title - using Keyboard Maestro variable by default
# Modify this line if using a different method to provide the title
POST_TITLE="$KMVAR_TCT"

# Define the base directory where the blog post folder will be created
# Replace this path with your preferred location
BASE_DIR="/path/to/your/blog/posts/folder"

# Create the main blog post folder with the given title
MAIN_FOLDER="${BASE_DIR}/${POST_TITLE}"
mkdir "$MAIN_FOLDER"

# Define array of subfolders to create
SUBFOLDERS=(
	"00- Source Material and Research"  # Research materials and references
	"01- Written Content"              # Draft and final post content
	"02- Images/01- Originals"         # Original, unedited images
	"02- Images/02- Working Files"     # Image files being edited
	"02- Images/03- Exported Images"   # Processed image exports
	"02- Images/04- Ready for Upload"  # Final images ready for WordPress
	"03- Social Media"                 # Social media planning and tracking
	"04- Metadata"                     # Post metadata and change tracking
)

# Create all subfolders
for folder in "${SUBFOLDERS[@]}"
do
	mkdir -p "$MAIN_FOLDER/$folder"
done

# Create social media tracking template
cat << EOF > "$MAIN_FOLDER/03- Social Media/Social Media for this Post.md"
# Published On
## Date
	-
## Platform
	-
# Post
EOF

# Create change log template
cat << EOF > "$MAIN_FOLDER/04- Metadata/Change Log for this Post.md"
# Published On
-
# Edited On
-
	- What edits were made?
		-
	- Why were these edits made?
		-
EOF

# Create WordPress metadata template
cat << EOF > "$MAIN_FOLDER/04- Metadata/WordPress Metadata for this Post.md"
# Chosen Post Category
-
# Chosen Post Tags
-
EOF

# Provide confirmation of successful creation
echo "Folder structure and Markdown files for '$MAIN_FOLDER' created successfully."
Automate the Maintenance of Your Project Files
Once you have your folder structure in place, there’s still ongoing maintenance to consider. While I love Hazel for automated file management, I prefer using a combination of Keyboard Maestro and shell scripts for more precise control over these files.
My file-naming approach depends on the context. For blog posts, I use a numbered system (e.g., “001- TMB Blog Post”), which keeps URLs clean and makes tracking my publishing history straightforward. In contrast, for work projects, where multiple document versions evolve with stakeholder feedback, the ISO 8601 date prefix provides a more reliable way to track changes over time.
For the blog, I have a maintenance script that handles two key tasks:
- File Naming Standardization– ensuring consistent numbered prefixes across all files
- Documentation Generation– automatically creating markdown templates for image alt text
Hazel could automate parts of this, but I prefer the precision of a Keyboard Maestro-triggered shell script; it ensures files are handled exactly as intended, at the right time. This approach aligns with my preference for mindful automation – using tools to save time while maintaining full awareness of what’s happening to my files.
#!/bin/bash
# =============================================================================
# Blog Post File Management Script
# Version: 1.0
# Created by: Mike Burke (https://www.themikeburke.com) and Claude (Anthropic)
# Last Updated: 2025-02-21
#
# License: MIT
# Copyright (c) 2025 Mike Burke
# Permission is hereby granted to use, copy, modify, and share this script freely,
# provided the above copyright and attribution notices are preserved.
# Full license text: https://opensource.org/licenses/MIT
#
# Description:
# Standardizes file naming and generates documentation templates for blog post
# folders. This script manages file prefixes and creates structured markdown
# documentation for image alt text, streamlining the blog post creation workflow.
#
# Functionality:
# 1. File Prefix Management
#    a. Extracts prefix number from parent folder name
#    b. Adds standardized prefix to all files
#    c. Prevents duplicate prefixing
#    d. Works recursively through all subfolders
#
# 2. Alt Text Documentation
#    a. Creates markdown template for image alt text
#    b. Processes images from upload-ready folder
#    c. Generates structured entries for images
#
# Customization:
# 1. Prefix Format
#    - Current: "XXX- TMB Blog Post- " where XXX is the folder number
#    - Modify PREFIX variable to change format (e.g., "XXX- Your Blog- ")
#
# 2. Folder Structure
#    - Expects images in "02- Images/04- Ready for Upload"
#    - Expects metadata in "04- Metadata"
#    - Update ALT_TEXT_FOLDER and METADATA_FOLDER if using different paths
#
# Usage:
# 1. Set up as a Keyboard Maestro macro
# 2. Select target blog post folder in Finder via KM prompt
# 3. Run script through Keyboard Maestro
# 4. Expected outcomes:
#    - All files prefixed with your standardized prefix
#    - Alt text markdown file created in metadata folder
#
# Note: This script is designed to work with Keyboard Maestro and expects the
# folder path to be passed via the KMVAR_folder variable. The script is
# idempotent and can be run multiple times safely on the same folder.
# =============================================================================

# Keyboard Maestro variable
DIR_PATH="$KMVAR_folder"

# Extract the post number from the folder name
FOLDER_NAME=$(basename "$DIR_PATH")
PREFIX_NUMBER=$(echo "$FOLDER_NAME" | grep -oE '^[0-9]{3}')

# Construct the prefix - modify this format to match your needs
PREFIX="${PREFIX_NUMBER}- TMB Blog Post- "

# Path to the folder containing images that need alt text
ALT_TEXT_FOLDER="$DIR_PATH/02- Images/04- Ready for Upload"

# Path to the metadata folder where the markdown file will be created
METADATA_FOLDER="$DIR_PATH/04- Metadata"

# Construct the alt text markdown file name
ALT_TEXT_FILE="${METADATA_FOLDER}/${PREFIX}Alt Text for Post Images.md"

# Function to add prefix and remove specific string from files
add_prefix_and_remove_string() {
    for FILE in "$1"/*; do
        if [ -d "$FILE" ]; then
            # Recurse into subdirectory
            add_prefix_and_remove_string "$FILE"
        elif [ -f "$FILE" ]; then
            # Get the base name of the file
            BASE_NAME=$(basename "$FILE")

            # Check if the file already has the correct prefix
            if [[ "$BASE_NAME" == "${PREFIX}"* ]]; then
                echo "Skipping already prefixed file: $BASE_NAME"
                continue
            fi

            # New file name with prefix and without specific string
            NEW_FILE_NAME=$(echo "$BASE_NAME" | sed -e "s/$(echo " for this post" | sed -e 's/[]\/$*.^[]/\\&/g')//I")

            # Rename file with prefix
            mv "$FILE" "${FILE%/*}/${PREFIX}${NEW_FILE_NAME}"
            echo "Renamed: $BASE_NAME -> ${PREFIX}${NEW_FILE_NAME}"
        fi
    done
}

# Function to generate alt text markdown file with image names
generate_alt_text_markdown() {
    if [ -f "$ALT_TEXT_FILE" ]; then
        echo "Alt text markdown file already exists: $ALT_TEXT_FILE"
    else
        if [ -d "$ALT_TEXT_FOLDER" ]; then
            echo "# Alt Text for Post Images" > "$ALT_TEXT_FILE"
            echo "" >> "$ALT_TEXT_FILE"
            # Find all image files and add their names to the markdown file
            for IMAGE in "$ALT_TEXT_FOLDER"/*.{jpg,jpeg,png,gif}; do
                if [ -f "$IMAGE" ]; then
                    IMAGE_NAME=$(basename "$IMAGE")
                    # Avoid adding the prefix again if the image already has it
                    if [[ "$IMAGE_NAME" == "${PREFIX}"* ]]; then
                        echo "## ${IMAGE_NAME}" >> "$ALT_TEXT_FILE"
                    else
                        echo "## ${PREFIX}${IMAGE_NAME}" >> "$ALT_TEXT_FILE"
                    fi
                    echo "Alt Text: " >> "$ALT_TEXT_FILE"
                    echo "" >> "$ALT_TEXT_FILE"
                fi
            done
            echo "Alt text markdown file created: $ALT_TEXT_FILE"
        else
            echo "No images found in the '04- Ready for Upload' folder."
        fi
    fi
}

# Start the renaming process
add_prefix_and_remove_string "$DIR_PATH"

# Generate the alt text markdown file
generate_alt_text_markdown
echo "File renaming and alt text file creation process completed."
Now
These organizational systems, templatized and automated, have transformed both my work and personal projects. At work, the benefits are clear: when I need to update training materials, every intermediate file is exactly where it should be. Screenshots, scripts, and source documents are logically organized and clearly named. More importantly, I know that when someone eventually inherits my work (as I once inherited others’), they’ll find a thoughtfully organized system rather than a digital maze.
At home, this approach has been equally valuable for my blog and YouTube content creation. The automation scripts handle the tedious setup work, which means I can focus on creating content rather than managing files. When I need to update a blog post or repurpose content for different platforms, everything I need is readily available and clearly organized.
The initial investment in creating these systems – from standardizing folder structures to writing automation scripts – has paid dividends in time saved and stress avoided. It’s mise en place in action: the careful preparation that makes the actual work flow smoothly.
Closure
Just as Alton’s mise en place prepares the way for efficient cooking, a thoughtful project structure prepares the way for efficient work. But unlike a perfectly organized set of ingredients that gets used up in a single meal, your digital organization system is something you’ll interact with day after day.
This means it’s worth taking time to reflect on how your system is (or isn’t) serving you. Are you consistently finding files where you expect them? Are you spending too much time organizing and not enough time creating? Do your folder structures and naming conventions still make sense for your current work? These reflections become the ingredients for improving your system.
The scripts and structures I’ve shared here aren’t meant to be a perfect solution – they’re a snapshot of what’s working for me right now, after years of iteration. Start with what makes sense for your work, experiment with automation where it feels valuable, and adjust as you learn. The goal isn’t perfection; it’s creating a system that helps you work more effectively while making life easier for future-you.


Leave a Reply
Want to join the discussion?Feel free to contribute!